Battery switch on travel trailer function is crucial for managing your RV’s power. Understanding how these switches work—whether single-pole, double-pole, or rotary—is key to preventing electrical issues and maximizing your battery life. This guide breaks down the types, functions, installation, troubleshooting, and maintenance of travel trailer battery switches, empowering you to keep your RV running smoothly.
We’ll cover everything from selecting the right amperage for your needs to performing basic maintenance and troubleshooting common problems. Think of this as your comprehensive guide to mastering your RV’s electrical system—one switch at a time!
Types of Battery Switches in Travel Trailers: Battery Switch On Travel Trailer Function
Choosing the right battery switch for your travel trailer is crucial for managing power and protecting your electrical system. Different types offer varying levels of control and safety features. Understanding their differences will help you select the best option for your needs.
Battery Switch Types and Their Characteristics
Travel trailers typically utilize a few common types of battery switches. Each has its own set of advantages and disadvantages impacting functionality and ease of use.
| Type | Advantages | Disadvantages | Typical Applications |
|---|---|---|---|
| Single-Pole, Single-Throw (SPST) | Simple, inexpensive, easy to install. Provides on/off control for a single battery. | Offers only basic on/off functionality; no ability to isolate batteries or switch between them. | Smaller trailers with a single battery, simple systems. |
| Double-Pole, Double-Throw (DPDT) | Allows switching between two batteries (e.g., house battery and starting battery), or isolating both. Offers more control over power distribution. | More complex installation than SPST switches. Can be more expensive. | Trailers with separate house and starting batteries, requiring independent control and isolation. |
| Rotary Switches | Often offer multiple positions (e.g., off, battery 1, battery 2, both batteries). Compact and visually appealing. | Can be more expensive than SPST or simple DPDT switches. May have more internal components that can fail. | Trailers requiring multiple battery configurations (e.g., charging one battery while using another). |
| Perko Switches (a type of rotary switch) | Robust construction, known for reliability and longevity. Clear indication of the selected position. | Typically more expensive than other rotary switches. | Trailers where reliability and long-term performance are prioritized. |
Considerations for Choosing a Battery Switch
The best type of battery switch depends on the size and complexity of your travel trailer’s electrical system and your specific needs. A single-battery setup might only require a simple SPST switch, while a larger RV with multiple batteries and solar panels would benefit from a more sophisticated DPDT or rotary switch offering better control and safety features. Consider factors like the number of batteries, the presence of a solar charging system, and your budget when making your selection.
Proper installation by a qualified technician is always recommended to ensure safe and reliable operation.
Wiring and Installation of Battery Switches
Installing a battery switch in your travel trailer is a relatively straightforward process that can significantly improve your power management. Proper wiring ensures reliable power distribution and protects your batteries and other electrical components. This section will guide you through the process, emphasizing safety and best practices.
Understanding the wiring diagram is crucial before beginning the installation. A correctly wired battery switch allows you to isolate your house batteries from the trailer’s electrical system, preventing unwanted battery drain when not in use and offering a degree of protection in case of short circuits.
Planning a trip? Don’t forget travel insurance! Seriously, it’s a lifesaver. Check out aon travel insurance for comprehensive coverage. They offer various plans, so you can find one that fits your budget and adventure level. And if you want another option to compare, look into aon travel insurance – they often have great deals, especially if you book in advance.
Getting insured is way easier than dealing with unexpected travel problems!
Typical Wiring Configuration
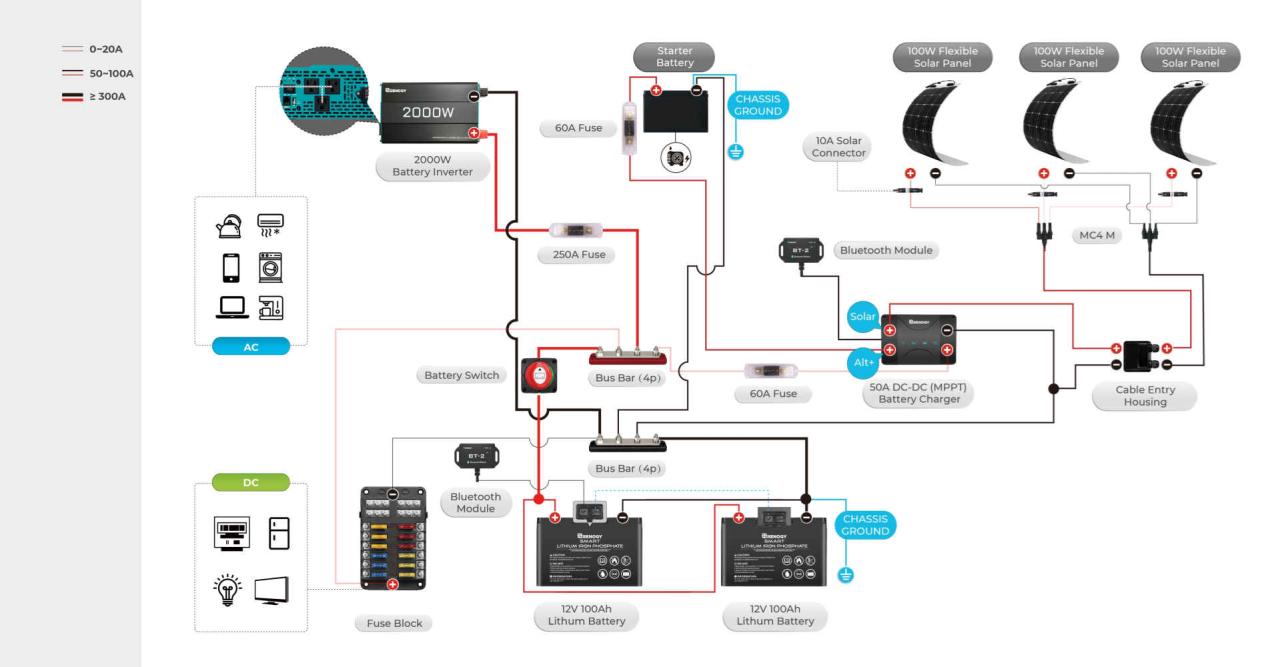
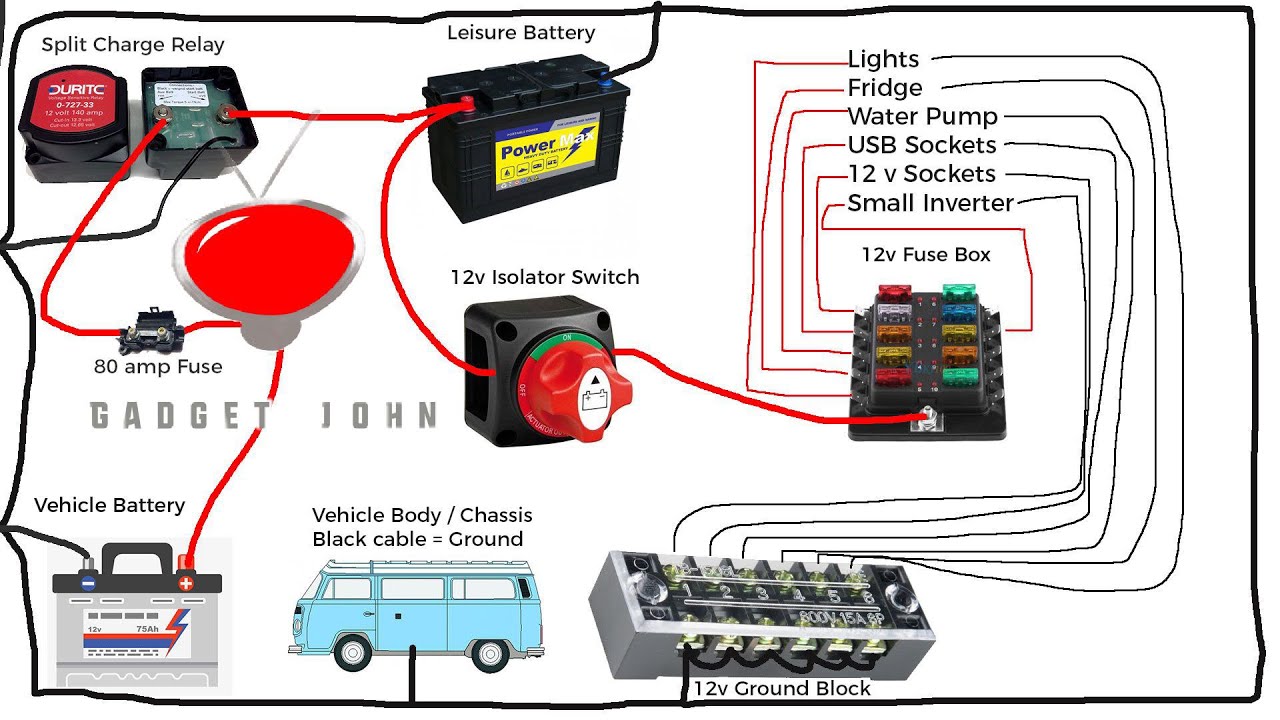
Imagine a simple diagram: Your main power source (shore power or generator) connects to the input side of the battery switch. The output of the battery switch then leads to your trailer’s 12V distribution panel. Your house batteries connect to the battery terminals of the switch. A separate wire runs from the battery’s negative terminal directly to the trailer’s chassis (ground). This is critical for safety and proper grounding.
This configuration allows you to switch power to the trailer’s 12V system on or off, effectively disconnecting the house batteries when not needed. The direct ground connection remains regardless of the switch position, ensuring a safe path for stray currents.
Step-by-Step Installation Guide
Before you begin, remember safety is paramount. Disconnect the negative terminal from your house batteries before starting any wiring work. This prevents accidental shorts and shocks. Always wear appropriate safety glasses and gloves.
Planning a trip? Don’t forget travel insurance! Seriously, it’s a lifesaver. Check out aon travel insurance for comprehensive coverage. They offer various plans, so you can find one that fits your needs and budget. Then, once you’ve got that sorted, compare it to other options like aon travel insurance to make sure you’re getting the best deal.
Remember, peace of mind is priceless, especially when you’re exploring new places!
- Choose the Installation Location: Select a location that’s easily accessible, well-ventilated, and protected from the elements. Consider proximity to your batteries and the trailer’s main power distribution panel for shorter wiring runs.
- Secure the Switch: Mount the battery switch securely using appropriate hardware. Ensure it’s firmly attached and won’t vibrate loose during travel.
- Connect the Battery Cables: Connect the positive (+) cable from your house batteries to the battery input terminal on the switch. Use appropriately sized wire and crimp connectors for a secure connection. Similarly, connect the negative (-) cable from your batteries to the negative terminal of the switch.
- Connect the Input and Output Wires: Connect the positive wire from your shore power/generator input to the input terminal of the battery switch. Connect the output wire from the switch to your trailer’s 12V distribution panel. Use appropriately sized wire and crimp connectors. Ensure all connections are tight and secure.
- Connect the Ground Wire: Connect a separate ground wire directly from the negative terminal of your house batteries to the trailer’s chassis. This should be a heavy-gauge wire for a reliable ground connection. Secure the ground wire with a bolt or clamp.
- Test the System: After completing the wiring, reconnect the negative battery terminal. Turn the battery switch on and check that your trailer’s 12V system is functioning correctly. Test all circuits and appliances.
Necessary Tools and Materials
Gathering the right tools and materials beforehand will streamline the installation process and ensure a safe and efficient outcome. This list covers the essentials, but you might need additional items depending on your specific setup.
- Battery switch (appropriate amperage rating)
- Battery cables (appropriate gauge and length)
- Wire connectors (crimp-on type)
- Crimping tool
- Wire strippers/cutters
- Screwdrivers (Phillips and flathead)
- Drill and bits (if necessary for mounting)
- Wrench (for battery terminals)
- Electrical tape
- Safety glasses
- Work gloves
- Multimeter (for testing)
Battery Switch Maintenance and Upkeep
Keeping your travel trailer’s battery switch in top condition is crucial for reliable power and preventing costly repairs down the road. Regular maintenance ensures your batteries charge correctly and that you can easily switch between power sources. Neglecting this simple task could lead to dead batteries, frustrating breakdowns, and potentially dangerous situations.Regular maintenance of your battery switch involves a simple schedule of inspections and cleaning, preventing corrosion and ensuring smooth operation.
This proactive approach saves you time and money in the long run, guaranteeing a more enjoyable camping experience.
Battery Switch Maintenance Schedule
A yearly inspection is a good starting point, but more frequent checks are recommended if you frequently use your travel trailer or live in a particularly harsh climate (high humidity, extreme temperatures). Consider these key intervals:
- Pre-Trip Inspection: Before each camping trip, visually inspect the switch for any signs of corrosion, loose connections, or damage. This quick check can prevent problems on the road.
- Seasonal Inspection: At the beginning and end of camping season, perform a more thorough inspection, including cleaning the connections and checking for any signs of wear and tear. This is especially important if your trailer is stored outdoors.
- Annual Inspection: Once a year, conduct a comprehensive inspection. This includes tightening all connections, cleaning the switch thoroughly, and testing its functionality. Consider applying a corrosion inhibitor to terminals to further protect against corrosion.
Cleaning and Inspecting Battery Switch Connections
Corrosion is the enemy of electrical connections. It can lead to poor conductivity, reduced charging efficiency, and even fire hazards. Cleaning and inspecting your battery switch connections regularly is essential.To clean the connections, first disconnect the batteries to prevent accidental short circuits. Use a wire brush or sandpaper to remove any corrosion from the terminals and the switch contacts.
Then, apply a dielectric grease to the terminals before reconnecting them. This grease helps prevent future corrosion and ensures a good electrical connection. Remember to always wear appropriate safety glasses and gloves when working with batteries and electrical connections.
Replacing a Faulty Battery Switch
If your battery switch is malfunctioning—for example, it’s sticking, not making proper contact, or showing signs of significant damage—replacement is necessary. Replacing a battery switch usually involves disconnecting the battery cables, removing the old switch, and installing a new one of the same type and rating. It’s crucial to match the new switch’s amperage rating to your battery system to avoid overloading.
If you are unsure about any step of this process, consult a qualified RV technician. Improper installation can lead to electrical hazards.
Selecting the Right Battery Switch for a Travel Trailer
Choosing the correct battery switch for your travel trailer is crucial for safe and reliable power management. The wrong switch can lead to overheating, damage to your electrical system, or even fire hazards. This section will guide you through the process of selecting a switch that meets your specific needs.
Battery Switch Selection Decision Tree, Battery switch on travel trailer function
A well-structured decision-making process is essential to ensure you select the right battery switch. This decision tree simplifies the selection process based on your travel trailer’s electrical system and power demands.
- Determine your battery bank configuration: Single battery or multiple batteries (parallel or series)? This dictates the required switch configuration (single or dual battery switch). A single battery setup needs a simple on/off switch; multiple batteries require a more sophisticated switch allowing isolation and parallel/series switching.
- Assess your power requirements: Calculate the total amperage draw of all your appliances and accessories. This will determine the required amperage rating of the battery switch. For example, a trailer with a 1000-watt inverter drawing a significant current would need a high amperage switch.
- Consider the type of battery: Lead-acid, AGM, or lithium? Different battery types may have different voltage requirements or sensitivities, impacting switch selection. Some switches are optimized for specific battery chemistries.
- Choose the appropriate switch type: Based on your needs, select a single-pole, double-pole, double-throw (SPDT), or a more complex configuration. Single-pole switches are suitable for single battery systems. More complex switches manage multiple batteries or power sources.
- Select mounting location and size: Choose a switch with a form factor and mounting style compatible with your travel trailer’s available space. Ensure the switch is easily accessible for operation and maintenance.
Determining Appropriate Amperage Rating
The amperage rating of your battery switch is paramount. It must exceed the maximum current your system will draw. To determine this, add up the amperage draw of all devices you’ll use simultaneously. For example, if your air conditioner draws 15 amps, your water heater 10 amps, and your lights 5 amps, your maximum simultaneous draw is 30 amps.
You would need a battery switch rated for at least 30 amps, ideally higher (e.g., 40 or 50 amps) to provide a safety margin. Always consider future upgrades when choosing an amperage rating; a slightly higher rating offers flexibility.
Remember to always add a safety margin (at least 20%) to the calculated amperage to account for inrush currents and future upgrades.
Comparison of Battery Switch Brands and Models
Several reputable brands manufacture battery switches suitable for travel trailers. Direct comparison requires detailed specifications from manufacturers’ websites. However, we can highlight some key features to consider.
| Brand | Model (Example) | Key Features | Specifications (Example) |
|---|---|---|---|
| Blue Sea Systems | 7610 | High-quality construction, robust design, easy installation, clearly marked terminals | 150A, SPST |
| Perko | 0094DP2CHR | Durable, corrosion-resistant materials, suitable for marine and RV applications, various amperage ratings | 50A, DPDT |
| Sterling Power | Various Models | Advanced features (e.g., remote control, monitoring capabilities), often found in higher-end systems | Vary widely, check individual model specs |
Note: This table provides examples; always check the manufacturer’s specifications for the most up-to-date information on amperage ratings, switch types, and other features. Features and availability can change.
Mastering your travel trailer’s battery switch is about more than just flipping a switch; it’s about ensuring safe and efficient power management. By understanding the different types of switches, their functions, and how to perform basic maintenance, you can extend the life of your batteries and avoid costly repairs. So, take the time to learn about your RV’s electrical system – your adventures will thank you for it!
Questions and Answers
What happens if I leave my battery switch on all the time?
Leaving your battery switch on constantly can drain your batteries, especially if you have parasitic draws (devices consuming power even when turned off). This can lead to dead batteries and potentially damage your electrical system.
How do I know which amperage battery switch I need?
The amperage rating should match or exceed the combined amperage draw of all the devices connected to that circuit. Check your RV’s electrical schematics or consult a qualified electrician.
Can I install a battery switch myself?
While possible, installing a battery switch incorrectly can be dangerous. If you’re not comfortable with electrical work, it’s best to hire a qualified RV technician or electrician.
Why is my battery switch getting hot?
A hot battery switch often indicates a high amperage draw, possibly from a short circuit or overloaded circuit. Turn off the switch immediately and investigate the problem.
